DIY Lean-To Shed: A Budget-Friendly Way to Add Value to Your Yard
Hey there, fellow DIY enthusiasts! So, you're looking to add some extra storage space to your yard, but the thought of shelling out a fortune for a pre-built shed has you groaning? You're in the right place! Building your own lean-to shed is a fantastically rewarding project that’s surprisingly easier than you think, and way cheaper than buying one ready-made. Let's dive into how you can create a functional and attractive lean-to shed without breaking the bank.
Planning Your Lean-To Shed: The Foundation of Success
Before you even think about grabbing a hammer, careful planning is key. This isn't just about throwing some wood together â€" a well-planned shed will last for years and actually enhance your property's value. Let's talk about the essentials:
Choosing Your Location:
Think about where your lean-to will go. Do you have a sturdy existing wall (house, garage, fence) to lean it against? This is crucial for support. Consider sunlight, drainage, and access â€" you don’t want to build it in a spot that’s perpetually flooded or impossible to get to with materials.
Determining the Size and Dimensions:
How much storage do you need? A small lean-to might suffice for gardening tools, while a larger one can accommodate bicycles, lawnmowers, and more. Sketch out a plan, measuring your available space and noting the dimensions of your chosen materials. Remember to factor in the thickness of the materials when calculating the overall dimensions.
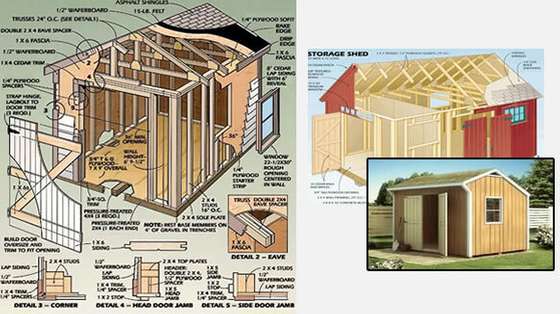
Gathering Your Materials:
This is where your budget comes into play. You can find great deals on lumber at your local home improvement store, especially during sales. Consider the following:
- Pressure-treated lumber for the base and framing â€" it’ll withstand the elements.
- Plywood or OSB (oriented strand board) for the siding and roofing.
- Roofing felt or shingles â€" choose something durable and weather-resistant.
- Nails, screws, and other fasteners.
- Optional: Paint or stain to protect the wood and add aesthetic appeal.
Don't forget to account for any extra materials you might need due to cutting errors or unexpected issues. It's always better to have a little extra than to run short mid-project!
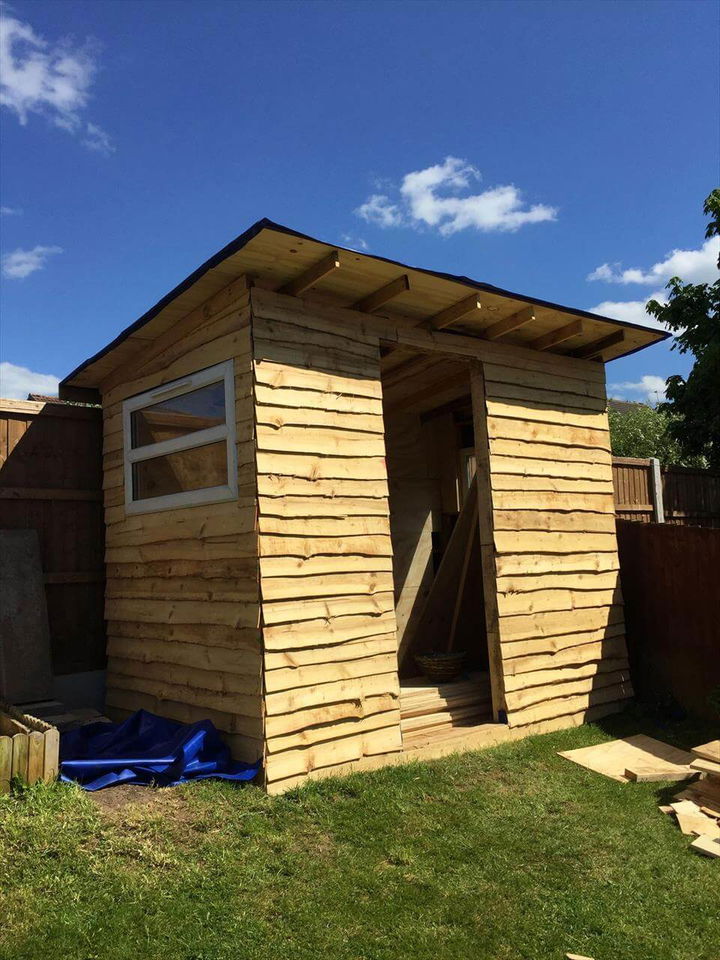
Building Your Lean-To Shed: A Step-by-Step Guide
Now for the fun part! Remember safety first â€" wear safety glasses and gloves, and always use caution when working with power tools.
Step 1: Preparing the Base:
Level the ground where your lean-to will sit. You might need to remove some soil or add gravel for a stable foundation. A concrete slab is ideal, but not strictly necessary for smaller sheds. A layer of gravel topped with landscaping fabric will help prevent weeds and improve drainage.
Step 2: Framing the Base:
Construct a sturdy frame using pressure-treated lumber. This will be the base of your shed. The dimensions should match your plan, ensuring a square and level structure. Securely fasten the frame together using appropriate screws or nails.
Step 3: Erecting the Walls:
You can use either vertical or horizontal siding. If using vertical siding, attach the chosen material (plywood or OSB) to the frame. For horizontal siding, ensure the horizontal boards are overlapping and properly secured for waterproofing.
Step 4: Building the Roof:
This is where things get a little more interesting. Your roof design will depend on the angle you want and the size of your shed. You'll need rafters (angled supports) and roof sheathing (plywood or OSB). Ensure the rafters are securely attached to the supporting wall and the frame of your shed.
Step 5: Installing the Roofing Material:
Lay down roofing felt (tar paper) over the roof sheathing to create a waterproof barrier before applying your shingles or other chosen roofing material. Follow the manufacturer’s instructions for proper installation of your roofing material.
Step 6: Finishing Touches:
Add a door (if desired), a small window for ventilation, and consider adding shelves or other interior organization to maximize your storage space. A fresh coat of paint or stain will not only protect the wood but also add a touch of personal style.
Tips for Keeping Costs Down
Building on a budget doesn’t mean sacrificing quality. Here are a few clever ways to keep your costs in check:
- Source reclaimed materials: Check local salvage yards or construction sites for usable lumber.
- Shop sales and clearances: Home improvement stores often have sales on building materials.
- Borrow tools: Avoid buying tools you'll only use once. Borrow from friends, family, or a local tool library.
- Keep it simple: A simpler design means fewer materials and less labor.
Commonly Asked Questions
Here are some questions I frequently get asked about building lean-to sheds:
Q: Do I need a permit to build a lean-to shed?
A: Permit requirements vary depending on your location. Check with your local building department to see if a permit is required for your specific project. It’s always better to be safe than sorry!
Q: How long does it take to build a lean-to shed?
A: The timeframe depends on the size and complexity of your design, your experience, and how much time you can dedicate to the project. A simple lean-to can be built in a weekend, but a more complex design might take longer.
Q: What kind of foundation do I need?
A: A level base is essential. For smaller lean-tos, a gravel base covered with landscaping fabric is usually sufficient. Larger lean-tos might benefit from a more substantial foundation, like concrete.
Q: Can I build a lean-to shed myself, even if I'm not experienced?
A: Absolutely! Start with a simple design, take your time, and don't be afraid to ask for help from more experienced DIYers. There are plenty of online resources and tutorials that can guide you through the process. Remember to prioritize safety!
Building your own lean-to shed is a fantastic way to add value to your yard while enjoying a rewarding DIY project. With careful planning and a bit of elbow grease, you can create a functional and attractive storage solution that perfectly suits your needs and budget. Happy building!